Here is a completely Docker-based single machine solution for JupyterHub: the Hub server is served from a Docker container, and it manages multiple JupyterLab instances through DockerSpawner. This is the middle ground between JupyterHub’s two official guides: TLJH (The Littlest JupyterHub, which runs on a single machine but does not use container) and Z2JH (Zero to JupyterHub for Kubernetes, which uses containers but I don’t have a K8s cluster). For my very special case1, this was the perfect solution for quickly hacking up a multi-user computing environment on a single machine so that I could do a technology demo.
While it was a toy deployment in my case, potentially the whole thing can reach some production level of complexity, according to the seemingly abandoned official jupyterhub-deploy-docker repo. Alternatively, there is this very helpful blog post (and this repo) describing a large scale deployment of JupyterHub for a university2.
Overview
Look at this awesome architectural diagram adapted from the official jupyterhub-deploy-docker repo:
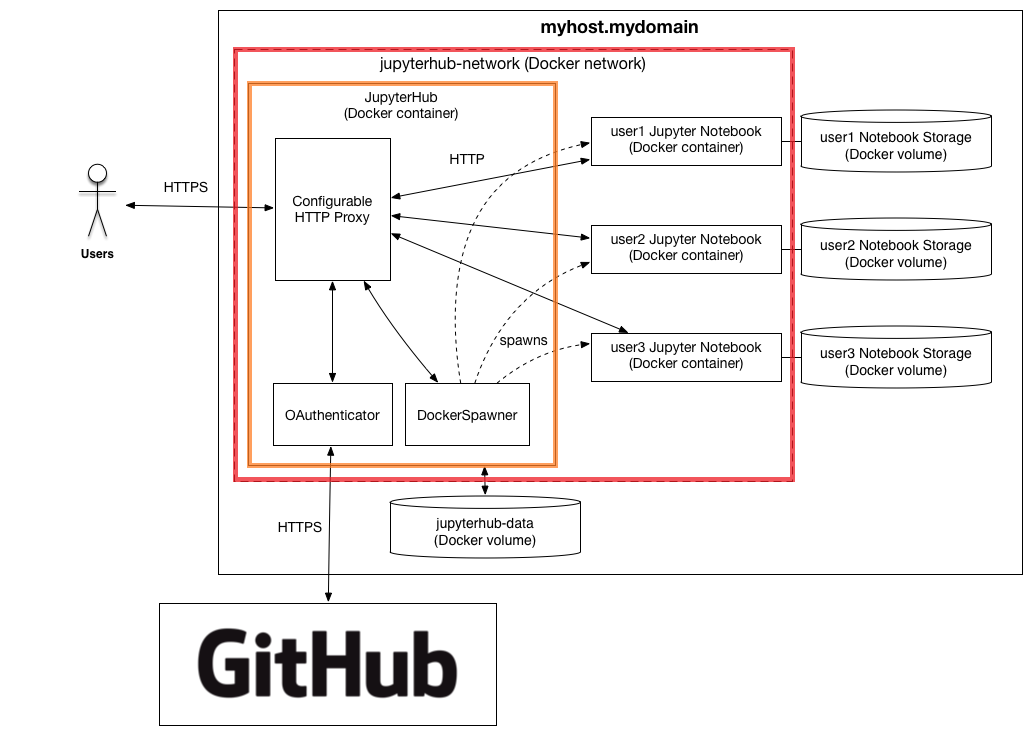
Since we don’t care about security, only the parts inside the red rectangle are essential for us. It just needs two Docker images:
- A customized image for JupyterHub (the orange rectangle) which has quite a few components
- A Jupyter image, based on which individual containers are spawned for the users
Requirements for running the whole thing is very simple: anything that runs Docker. Docker Compose is preferred, but you can always use Portainer to run thecompose.yaml file.
Build
JupyterLab
Unless you want something special, there is no need to build JupyterLab by yourself. Just go to Jupyter Docker Stacks and pick a image. For this guide let’s pick jupyter/scipy-notebook3:
docker pull jupyter/scipy-notebook:latest
JupyterHub
There is an official image called jupyterhub/jupyterhub, but it no longer works for our purpose because it’s just the Hub without all the other necessary components. For our purpose we need:
- JupyterHub
- DockerSpawner, which will manage all the Jupyter instances
- JupyterHub Idle Culler Service (not included in the above diagram), which can be configured to to identify and shut down idle or long-running Jupyter instances
- JupyterHub First Use Authenticator (instead of the OAuthenticator in the above diagram), a simple authenticator that helps new users set their password on their first login to JupyterHub
- Configurable HTTP Proxy, which JupyterHub will use to forward traffic from individual users to their individual Jupyter containers
The official image only has 1, 2 & 3 can be installed from PyPI or Conda-Forge, 4 is only available from PyPI, while 5 needs Node.js and is recommended to be installed from npm.
But actually you can install Node.js and many npm packages with Conda, which naturally also takes care of Conda & PyPI packages. So I picked mambaforge4 as the base for building the image.
Besides the Dockerfile, a config file jupyterhub_config.py for JupyterHub is also necessary for building the image. Before building, you should have a directory named as jupyterhub with 2 files like this:
jupyterhub
├── Dockerfile
└── jupyterhub_config.py
Dockerfile
The example here uses mambaforge version 22.9.0-1, installs the above listed components, and copies everything under the directory directly into the image5.
FROM condaforge/mambaforge:22.9.0-1
RUN mamba install configurable-http-proxy -y && \
    python -m pip install --no-cache-dir \
    dockerspawner \
    jupyterhub \
    jupyterhub-firstuseauthenticator \
    jupyterhub-idle-culler
COPY . .
ENTRYPOINT jupyterhub
jupyterhub_config.py
To make use of the additional components, the default configuration file is not enough. Since it’s just a Python file, we can also use the os module to expose some options as environment variables, which can be passed later.
import os
from firstuseauthenticator import FirstUseAuthenticator

c.JupyterHub.spawner_class = "dockerspawner.DockerSpawner"
c.DockerSpawner.image = os.environ["DOCKER_JUPYTER_IMAGE"]
c.DockerSpawner.network_name = os.environ["DOCKER_NETWORK_NAME"]
c.JupyterHub.hub_ip = os.environ["HUB_IP"]
c.JupyterHub.services = [
    {
        "name": "cull_idle",
        "admin": True,
        # kill idle containers after 1 hour, but do not remove
        "command": "cull_idle_servers.py --timeout=3600".split(),
    },
]
c.JupyterHub.authenticator_class = "firstuseauthenticator.FirstUseAuthenticator"
c.Authenticator.admin_users = {"admin"}
c.DockerSpawner.notebook_dir = "/home/jovyan"
c.Spawner.default_url = "/lab" # use JupyterLab (instead of Notebook) by default
c.Spawner.cpu_limit = 1
c.Spawner.mem_limit = "1G"
c.JupyterHub.admin_access = True
With these two files ready, you can either build and tag the JupyterHub image now with docker build -t jupyterhub . in side the directory, or build it later with Docker Compose.
Deploy
Here is the Docker Compose file if the above image is already built:
version: '3'

services:
  jupyterhub:
    image: jupyterhub
    container_name: jupyterhub-hub
    volumes:
      - "/var/run/docker.sock:/var/run/docker.sock"
    ports:
      - 8000:8000
    environment:
      DOCKER_JUPYTER_IMAGE: jupyter/scipy-notebook
      DOCKER_NETWORK_NAME: jupyterhub_default
      HUB_IP: jupyterhub-hub
Note that the environment variables are essential: they correspond to the values set as os.environ in the jupyterhub_config.py file. The DOCKER_JUPYTER_IMAGE should just be the image name for your chosen JupyterLab or Notebook image; the DOCKER_NETWORK_NAME should refer to the final network created by Docker Compose or Portainer, usually it’ll be {stack_name}_default; the HUB_IP can be the same as container_name and Docker will know it refers to the container.
Portainer
Create a new stack in Portainer, put ‘jupyterhub’6 as the name, and copy the Docker Compose file above to the content. Click ‘Deploy the stack’, and you should be able to access JupyterHub at port 8000.
Docker Compose
With classic Docker Compose, create a directory jupyterhub, put only one file compose.yaml with the same content under it, then docker compose up -d.
Build the Image during docker compose up
If you prefer (re)building the JupyterHub image every time you deploy, you can use Docker Compose (but probably not Portainer) to do so. First you need to put the compose.yaml file and the jupyterhub directory under a same directory, for example:
jupyterhub
├── compose.yaml
└── jupyterhub
    ├── Dockerfile
    └── jupyterhub_config.py
Then edit the compose file by giving it a build context (build: ./jupyterhub):
version: '3'

services:
  jupyterhub:
    image: jupyterhub
    build: ./jupyterhub
    container_name: jupyterhub-hub
    volumes:
      - "/var/run/docker.sock:/var/run/docker.sock"
    ports:
      - 8000:8000
    environment:
      DOCKER_JUPYTER_IMAGE: jupyter/scipy-notebook
      DOCKER_NETWORK_NAME: jupyterhub_default
      HUB_IP: jupyterhub-hub
Then it’s just the same docker compose up -d (at the outer jupyterhub directory) to build and run.
Manage
With the example configurations above, once deployed, you can log in as admin user at port 8000. You will also need to set a password during your first login. Then you can manage your JupyterHub through the Web UI, such as add or remove users.
Also with the current cull_idle_servers config, idle containers are killed but not removed, so that when users come back, they can still pick up from where they left. But you can still manually remove these containers from Docker. Once removed, all changes will be lost because no persistent volumes were configured. This may or may not be desired depending on your use case.
Enhancement
Further enhancements, such as persistent volumes, different Jupyter images, HTTPS, OAuthenticator (integration with other OAuth providers), are left as a practice for the reader.
-
I don’t have a powerful enough Linux server for about 20 people running Jupyter concurrently. But I have root access to a very powerful Synology NAS, which runs Docker. ↩︎
-
Unfortunately they were using a very old version of JupyterHub image, which no longer works for the latest ones as of late 2022. ↩︎
-
For better reproducibility and Docker best practice, maybe you should choose a more specific tag and avoid using
latest, such asjupyter/scipy-notebook:ubuntu-22.04. ↩︎ -
In short,
condaforgeis just communitycondaandmambais just fasterconda, somamabaforgeis my choice whenever I needconda. ↩︎ -
Or you can copy only the
jupyterhub_config.pyfile, or copy nothing and mount it at/jupyterhub_config.pywhen you run the image. Personally I prefer also including the Dockerfile in the image, so that whoever ends up with the image can easily find out what’s in it. ↩︎ -
If you use a different stack name, don’t forget to change
DOCKER_NETWORK_NAMEaccordingly. ↩︎
Last modified on 2022-11-11